Home / Sustainability / How to Fix and Mend Kids Clothing

All three of my children wear the sports shorts for PE at school, and they wash brilliantly, all the uniforms still look as good as new. I would definitely recommend to friends.

Leighanne, Mum of three

At David Luke, we believe that sustainably made school uniform can be worn for longer. If you’re interested in recycling clothes, why not check out our new tutorials made in collaboration with the Ministry of Craft.

Don’t let a hole or split seam signal the end of your school uniform. Our easy-to-follow tutorials will help you with some of the most common fixes. If you want to extend the life of your school uniform, why not try a simple upcycling project such as turning trousers into shorts? We love transforming old uniform into new stuff. Watch our tutorial to find out how you can turn an old sweatshirt into a personalised PE kit bag. A great summer craft activity for kids of all ages.

The Ultimate School Uniform Upcycle: How To Make A PE Bag From A Sweatshirt

As the school term finishes, we often find ourselves with pieces of uniform that can no longer be used. Whether we’ve repaired all the holes or there’s that one stain we can’t quite get out, sadly these pieces can’t be passed on to the next student or donated. When we spoke to the Ministry of Craft about this issue, they had an amazing upcycling idea to share. This clothes recycling tutorial is a great activity to keep kids entertained during the school holidays. Keep reading to discover how to make a personalised PE bag from an old school sweatshirt.

  1. Draw a line from the underarm of one sleeve to the underarm of the opposite sleeve and cut along the line.
  2. Close the opening which will be the bottom of the bag. If you haven’t got a sewing machine, you could hand stitch using backstitch or use a decorative blanket stitch.

How To Hand Sew A Backstitch

  1. Turn your bag inside out and pin the two edges together where the seam is going to be sewn.
  2. Thread a needle, a double is recommended for speed as it produces the strength required quicker. Pull the thread through the needle so that there is an equal length of thread extending from both sides and tie a knot.
  3. Using a backstitch (a strong hand sewing stitch), insert your needle into the fabric from underneath starting at one end.
  4. Push the needle back through both layers of fabric about 0.5cm in along the seam line in the direction of the opposite end. Then, push the needle back up through the fabric further along the seam line towards the other end about 0.5cm from the previous stitch.
  5. Then push the needle into the fabric at the base of the previous stitch going in a backwards direction. Then, push the needle back up through the fabric further along the seam line towards the other end about 0.5cm in front of the previous stitch.
  6. Continue along the length of the opening finishing at the other end.
  7. To finish the seam, make a few stitches right on top of one another, this will anchor the thread like a knot and cut off the excess thread and the end and start.
  8. Give your fixed seam a press with the iron.

How To Hand Sew A Blanket Stitch

Originally used to stitch the edges of blankets, it not only gives the edges a nice look but also secures them.

  1. Thread a needle with embroidery thread and put a knot in the end.
  2. Working with the bag right side out, and from the left-to-right direction.
  3. Start between the 2 layers so the knot is hidden on the inside, pushing the needle from the inside to the top layer, then wrap the thread around to the back and push the needle up through both layers coming out at the same position.
  4. As you pull the thread, pass your needle through the loop it forms to create the first secure stitch.
  5. Repeat again, always coming from the back to the front and moving about 0.5cm along the seam line. Repeat until you get to the end of your seam ensuring each stitch length and depth is the same.
  6. To finish the seam, from the inside so it will not be seen, make a few stitches right on top of one another, this will anchor the thread like a knot and cut off the excess thread.

With the new PE bag now complete, you can decorate the front of the bag to personalise it with some of the ideas below

  • Appliqué your name
  • Use embroidery stitches
  • Use fabric paint
  • Apply a screen print
  • Sew on buttons or other trims
  • If you have a sewing machine, use the embroidery stitches or freestyle with free machine embroidery

To create the closing of the bag

  1. Cut a length of cord or ribbon to insert into the rib channel.
  2. On the inside of the rib seam, use a seam ripper to open up a small gap.
  3. Attach a safety pin to the end of your cord or ribbon and push the safety pin through the gap, around the rib channel and back through the gap.
  4. Remove the safety pin, knot the ends of the cord/ribbon together and pull to draw the bag closed.

How To Sew On A Two Hole Button

There are two ways to sew on a button, either by hand or with a sewing machine if you have one. The ability to sew a button comes in handy when one falls off your kids’ school uniform. 
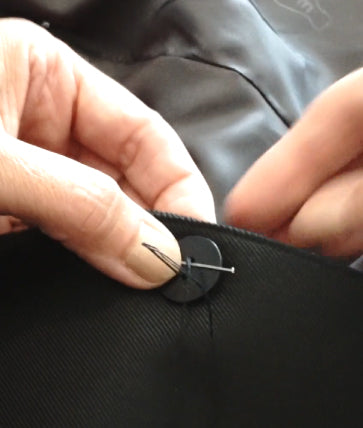
The Ministry of Craft has detailed how to sew a button by hand and using a machine, take a look at the easy step-by-step process below.

Sewing a Button By Hand

  1. Select a suitable button that matches the garment or other buttons and thread that matches the button.
  2. Thread a needle, a double is recommended for speed as it produces the strength required quicker. Pull the thread through the needle so there’s an equal length of thread extending from both sides and tie a knot.
  3. Line the button up with the other buttons on the garment, if there are any, and make sure that it lines up with the buttonhole.
  4. Push the threaded needle up through the fabric and through one hole in the button. Pull the thread all the way through on each stitch.
  5. Place a pin or needle on top of the button between the two holes to keep the button from being stitched too tight. Then, push the needle down through the next hole and through the fabric. Pull the thread all the way through. For a 4-hole button push the needle down through the diagonally opposite hole.
  6. Restart the process and repeat enough times, approximately 5-6, to make sure the button is securely in place. For a 4-hole button, at the back of the fabric, cross over to the other pair of holes and repeat the process to create two sets of stitches that cross.
  7. On the last stitch, push the needle through the material, but not through a hole in the button.
  8. Remove the pin/needle and wrap the thread about six times around the thread between the button and the material to reinforce the shank you have created.
  9. Push the needle back down through the material and make three or four stitches to secure the thread, passing the needle through a loop of thread on the last two to form a knot and cut off the excess thread.

How to Sew on a Button by Machine

  1. Attach the button sewing foot.
  2. Lower the feed dogs.
  3. Set the stitch pattern to zig-zag stitch.
  4. Place the button in place under the foot and lower the foot. Position the button and using the balance wheel to lower the needle, check it goes into the middle of the left hole.
  5. Continue using the balance wheel so the needle goes up and down into the middle of the right hole, adjust the stitch width if necessary.
  6. Make about eight stitches to hold the button in place then cut the threads.

How To Hem Trousers and Turn Trousers Into Shorts

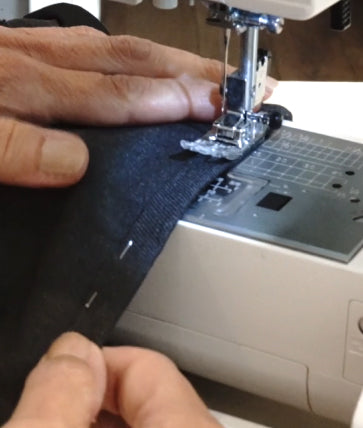
Hemming trousers is a great solution if the trousers are too long or you’ve bought a longer length to get more wear out of them. This how to hem guide can also be used for hemming school skirts and dresses, or any hem really. The Ministry of Craft has also shared how to turn trousers into a pair of shorts with this hemming guide. This is a wonderful way to upcycle school trousers for the summer term.
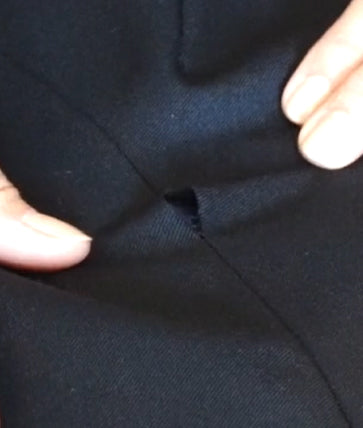
How To Shorten A Pair Of Trousers Into Shorts

Give your school trousers a new lease of life with these simple steps.

  1. If the trousers are creased, press them first.
  2. Put the trousers on and place a pin in one of the legs where you want the shorts to end or measure against an existing pair of shorts that fit.
  3. Measure from the hem to the position of the pin and deduct 1.5cm for the hem allowance.
  4. Using this measurement, make a few chalk marks from the hem and join them together making sure the line is parallel to the hem.
  5. Cut the excess fabric away and use this as a template to cut away the excess fabric on the other leg.
  6. Hem each leg either by hand or machine using the steps below.

How To Sew A Hem By Hand

If you don’t have a sewing machine or don’t want to see machined stitches on the outside of your hemmed garment, this is how you hand sew a hem in 8 easy steps.

  1. Press the hem up 0.5cm evenly all the way around then, press again 1cm evenly all the way around producing a double turned hem that encloses the raw edge.
  2. Thread a needle with a single layer of thread that is a close match in colour with the garment and tie a knot in the longest end of the thread. Make a few stitches right on top of one another in one of the inside seam allowances to anchor the thread.
  3. Working on the wrong side of the fabric and using a slip stitch, sometimes called invisible stitch, bring the needle up through the top folded edge.
  4. Be careful to take a very small stitch catching only a few threads of the fabric above the folded hem as this is the layer that will be seen when the garment is turned right side out.
  5. Next, go through the edge of the folded hem below the first stitch and bring the needle back out through the fold about 1cm away.
  6. Repeat the steps above for each stitch, avoid tugging too hard on the stitches to prevent it noticeably pulling or puckering the outer fabric.
  7. To finish make a few stitches right on top of one another on the inside seam allowances where you started to anchor the thread.
  8. Give your hem a press with the iron.

How To Sew A Hem Using A Sewing Machine

  1. Press the hem up 0.5cm evenly all the way around then, press again 1cm evenly all the way around producing a double turned hem that encloses the raw edge.
  2. Remove the free arm from the sewing machine and place the garment over the arm inside out, if you’re hemming trousers or shorts do one leg at a time. Start at the inside leg seam but either in front or after it rather than on it.
  3. Lower the presser foot onto the hem so the right edge of the foot is on the bottom folded hem.
  4. Move the needle so it sews about 2 or 3mm from the top fold. There is no need to reverse stitch as you will meet up with your stitches and sew over them.
  5. As you sew around the hem, ensure the edge of the foot stays on the bottom fold, from the right side you will then see a nice parallel line of stitches.
  6. Before you sew over your starting stitches to secure them, wiggle the thread to bring the thread on the right side of the hem to the back so you don’t have to cut the end on the right side. After you have sewn over about 2cm of your starting stitches, being careful to sew exactly on top, do the same thing again and cut off the excess thread.
  7. Give your hem a press with the iron.

How To Repair A Broken Seam

How To Repair A Hole In A Seam By Hand

  1. Turn your garment inside out and inspect the ripped seam. Note where the ripped seam begins and ends as this will be where you need to resew the seam to repair it.
  2. If you see any loose stitches or threads remove them so everything is neat and tidy.
  3. If you need to, press with the iron to get the fabric to lay straight and pin the two pieces of fabric together where the seam has ripped.
  4. Thread a needle, a double is recommended for speed as it produces the strength required quicker. Pull the thread through the needle so that there is an equal length of thread extending from both sides and tie a knot.
  5. Using a backstitch, insert your needle into the fabric from underneath starting about 2cm before the beginning of the ripped seam, at first, you’ll be sewing over some existing stitches. This will help further secure the new seam as well as the old seam that’s on either side.
  6. Push the needle back through both layers of fabric about 0.5cm in along the seam line in the direction of the rip. Then, push the needle back up through the fabric further along the seam line towards the rip about 0.5cm from the previous stitch.
  7. Then push the needle into the fabric at the base of the previous stitch going in a backwards direction. Then, push the needle back up through the fabric further along the seam line towards the rip about 0.5cm in front of the previous stitch.
  8. Continue along the length of the ripped seam finishing about 2cm past the rip. This smaller stitch length is important for parts of a garment that need durability, such as a crotch seam.
  9. To finish the seam, make a few stitches right on top of one another, this will anchor the thread like a knot and cut off the excess thread and the end and start.
  10. Give your fixed seam a press with the iron.

How To Repair A Hole In A Seam By Machine

  1. Turn your garment inside out and inspect the ripped seam. Note where the ripped seam begins and ends as this will be where you need to resew the seam to repair it.
  2. If you see any loose stitches or threads remove them so everything is neat and tidy.
  3. If you need to, press with the iron to get the fabric to lay straight and pin the two pieces of fabric together where the seam has ripped.
  4. Start stitching about 2cm before the beginning of the ripped seam, at first, you’ll be sewing over some existing stitches. This will help further secure the new seam as well as the old seam without needing to reverse stitch.
  5. Continue along the length of the ripped seam finishing about 2cm past the rip again to secure the new seam as well as the old seam without needing to reverse stitch.
  6. Give your fixed seam a press with the iron.

That concludes the easy to follow how to tutorials for fixing and mending kids school uniform. We’d like to say a big thank you to the Ministry of Craft for sharing their expertise and providing us with these how-to guides. Give the tutorials a try and share your results with us on Instagram and Facebook. As part of our Re:Uniform campaign this back to school we’re encouraging each other to love, fix, and swap our unwanted clothing, learn more about how to Re:Uniform here.

Discover our range of school uniform and PE kit, including sustainably made Eco-uniform made from recycled plastic bottles. If you need any more information on these tutorials or assistance with back to school shopping, get in touch with our friendly team today for help. Alternatively, visit one of our 600 stockists across the UK in person, use our postcode search to find your local stockist.

All three of my children wear the sports shorts for PE at school, and they wash brilliantly, all the uniforms still look as good as new. I would definitely recommend to friends.

Leighanne, Mum of three

Sign up to hear about our news & exclusive offers

    We don't share your information with any third party companies and only use your data in accordance with our privacy policy, and of course, you can withdraw your consent at any time. Privacy policy